By: CS2103AUG2017 T17-B1 Since: Sep 2017 Licence: MIT
- 1. Introduction
- 2. Setting up
- 3. Design
- 4. Implementation
- 4.1. Undo/Redo mechanism
- 4.2. Borrow/payback command mechanism
- 4.3. Backup storage mechanism
- 4.4. Date storing mechanism
- 4.5. List (Masterlist, Blacklist, etc.) mechanism
- 4.6. Cluster mechanism
- 4.7. Filter by tags mechanism
- 4.8. Login/logout mechanism
- 4.9. Sorting mechanism
- 4.10. Optional command indexes
- 4.11. Interest Calculator Mechanism
- 4.12. Theme Changing Mechanism
- 4.13. Repaid command mechanism
- 4.14. Setpath/Addpic/Delpic command mechanism
- 4.15. Logging
- 4.16. Configuration
- 5. Documentation
- 6. Testing
- 7. Dev Ops
- Appendix A: Suggested Programming Tasks to Get Started
- Appendix B: User Stories
- Appendix C: Use Cases
- Appendix D: Non Functional Requirements
- Appendix E: Glossary
- Appendix F: Product Survey
1. Introduction
Codii is an address book application specifically designed for debt collectors to manage debts and debtors efficiently. It provides the necessary tools to keep track of interests, debts and important dates such as repayment deadlines. This developer guide provides detailed information for future contributors to improve on the current code base, testing and documentation.
2. Setting up
2.1. Prerequisites
-
JDK
1.8.0_60or laterHaving any Java 8 version is not enough.
This app will not work with earlier versions of Java 8. -
IntelliJ IDE
IntelliJ by default has Gradle and JavaFx plugins installed.
Do not disable them. If you have disabled them, go toFile>Settings>Pluginsto re-enable them.
2.2. Setting up the project in your computer
-
Fork this repo, and clone the fork to your computer
-
Open IntelliJ (if you are not in the welcome screen, click
File>Close Projectto close the existing project dialog first) -
Set up the correct JDK version for Gradle
-
Click
Configure>Project Defaults>Project Structure -
Click
New…and find the directory of the JDK
-
-
Click
Import Project -
Locate the
build.gradlefile and select it. ClickOK -
Click
Open as Project -
Click
OKto accept the default settings -
Open a console and run the command
gradlew processResources(Mac/Linux:./gradlew processResources). It should finish with theBUILD SUCCESSFULmessage.
This will generate all resources required by the application and tests.
2.3. Verifying the setup
-
Run the
seedu.address.MainAppand try a few commands -
Run the tests to ensure they all pass.
2.4. Configurations to do before writing code
2.4.1. Configuring the coding style
This project follows oss-generic coding standards. IntelliJ’s default style is mostly compliant with ours but it uses a different import order from ours. To rectify,
-
Go to
File>Settings…(Windows/Linux), orIntelliJ IDEA>Preferences…(macOS) -
Select
Editor>Code Style>Java -
Click on the
Importstab to set the order-
For
Class count to use import with '*'andNames count to use static import with '*': Set to999to prevent IntelliJ from contracting the import statements -
For
Import Layout: The order isimport static all other imports,import java.*,import javax.*,import org.*,import com.*,import all other imports. Add a<blank line>between eachimport
-
Optionally, you can follow the UsingCheckstyle.adoc document to configure Intellij to check style-compliance as you write code.
2.4.2. Updating documentation to match your fork
After forking the repo, links in the documentation will still point to the se-edu/addressbook-level4 repo. If you plan to develop this as a separate product (i.e. instead of contributing to the se-edu/addressbook-level4) , you should replace the URL in the variable repoURL in DeveloperGuide.adoc and UserGuide.adoc with the URL of your fork.
2.4.3. Setting up CI
Set up Travis to perform Continuous Integration (CI) for your fork. See UsingTravis.adoc to learn how to set it up.
Optionally, you can set up AppVeyor as a second CI (see UsingAppVeyor.adoc).
| Having both Travis and AppVeyor ensures your App works on both Unix-based platforms and Windows-based platforms (Travis is Unix-based and AppVeyor is Windows-based) |
2.4.4. Getting started with coding
When you are ready to start coding:
-
Get some sense of the overall design by reading the Architecture section.
-
Take a look at the section Suggested Programming Tasks to Get Started.
3. Design
3.1. Architecture
Figure 3.1.1 below explains the high-level design of the App. Given below is a quick overview of each component.

Figure 3.1.1 : Architecture diagram
The .pptx files used to create diagrams in this document can be found in the diagrams folder. To update a diagram, modify the diagram in the pptx file, select the objects of the diagram, and choose Save as picture.
|
Main has only one class called MainApp. It is responsible for:
-
At app launch: Initializes the components in the correct sequence, and connects them up with each other.
-
At shut down: Shuts down the components and invokes cleanup method where necessary.
Commons represents a collection of classes used by multiple other components. Two of those classes play important roles at the architecture level:
-
EventsCenter: This class (written using Google’s Event Bus library) is used by components to communicate with other components using events (i.e. a form of Event Driven design) -
LogsCenter: Used by many classes to write log messages to the App’s log file.
The rest of the App consists of four components:
Each of the four components:
-
Defines its API in an
interfacewith the same name as the Component. -
Exposes its functionality using a
{Component Name}Managerclass.
For example, the Logic component (see Figure 3.1.2 below) defines it’s API in the Logic.java interface and exposes its functionality using the LogicManager.java class.

Figure 3.1.2 : Class diagram of the Logic component
Events-Driven nature of the design
Figure 3.1.3a below shows how the components interact for the scenario where the user issues the command delete 1.

Figure 3.1.3a : Component interactions for delete 1 command (part 1)
Note how the Model simply raises a AddressBookChangedEvent when the Address Book data are changed, instead of asking the Storage to save the updates to the hard disk.
|
Figure 3.1.3b below shows how the EventsCenter reacts to that event, which eventually results in the updates being saved to the hard disk and the status bar of the UI being updated to reflect the 'Last Updated' time.

Figure 3.1.3b : Component interactions for delete 1 command (part 2)
Note how the event is propagated through the EventsCenter to the Storage and UI without Model having to be coupled to either of them. This is an example of how this Event Driven approach helps us reduce direct coupling between components.
|
The sections below give more details of each component.
3.2. UI component
As shown in Figure 3.2.1 below, the UI consists of a MainWindow that is made up of parts e.g.CommandBox, ResultDisplay, PersonListPanel, StatusBarFooter, BrowserPanel etc. All these, including the MainWindow, inherit from the abstract UiPart class.

Figure 3.2.1 : Structure of the UI component
API : Ui.java
The UI component uses JavaFx UI framework. The layout of these UI parts are defined in matching .fxml files that are in the src/main/resources/view folder. For example, the layout of the MainWindow is specified in MainWindow.fxml
The UI component:
-
Executes user commands using the
Logiccomponent. -
Binds itself to some data in the
Modelso that the UI can auto-update when data in theModelchange. -
Responds to events raised from various parts of the App and updates the UI accordingly.
3.3. Logic component
Figure 3.3.1 shows the structure of the Logic component, while Figure 3.3.2 shows finer details concerning XYZCommand and Command in Figure 3.3.1.

Figure 3.3.1 : Structure of the Logic component
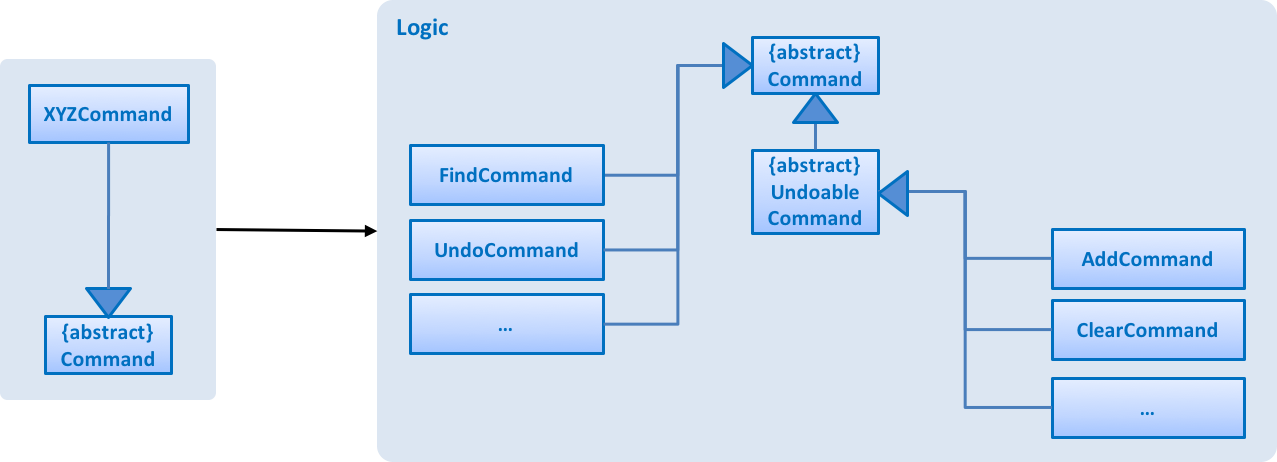
Figure 3.3.2 : Structure of commands in the Logic component
API :
Logic.java
-
Logicuses theAddressBookParserclass to parse the user command. -
This results in a
Commandobject which is executed by theLogicManager. -
The command execution can affect the
Model(e.g. adding a person) and/or raise events. -
The result of the command execution is encapsulated as a
CommandResultobject which is passed back to theUI.
Figure 3.3.3 below shows the interactions within the Logic component for the execute("delete 1") API call.
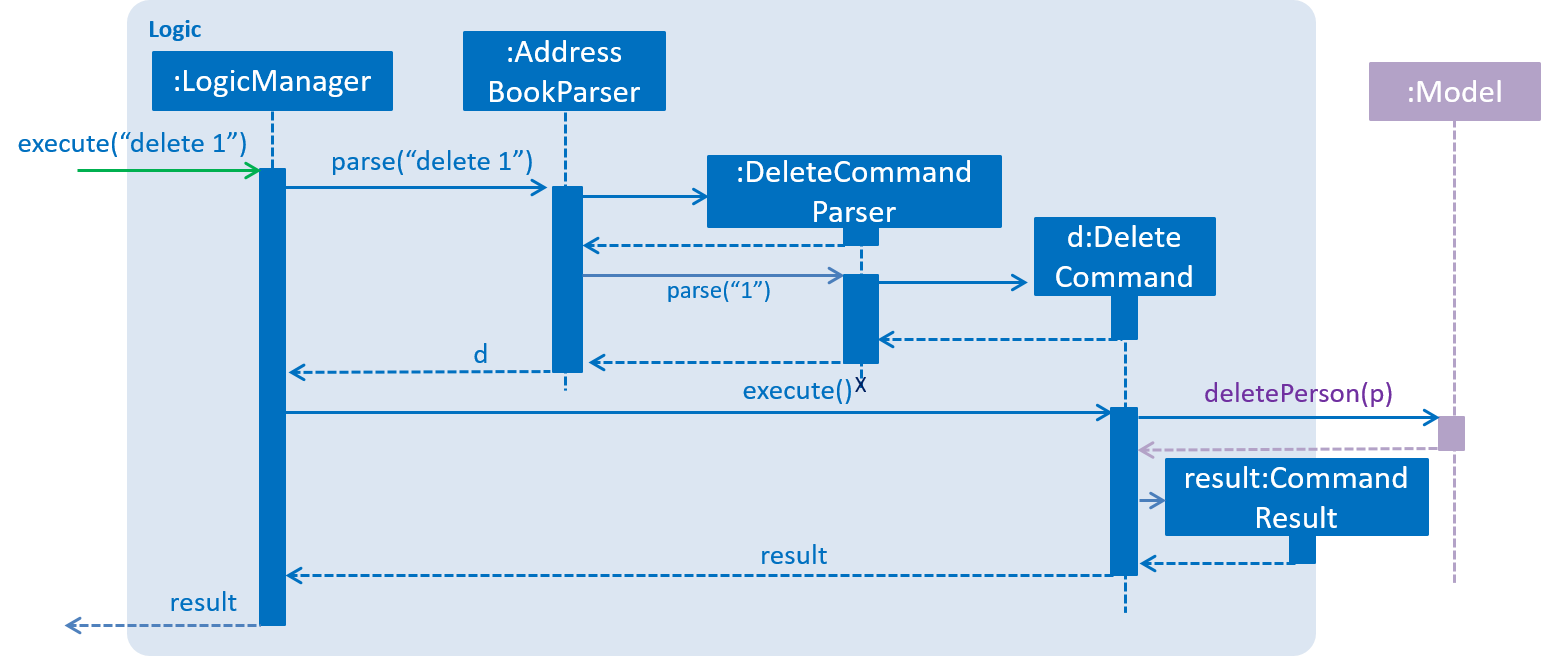
Figure 3.3.3 : Sequence diagram for interactions inside the Logic component for the delete 1 command
3.4. Model component
Figure 3.4.1 below shows the structure of the Model component.

Figure 3.4.1 : Structure of the Model component
API : Model.java
The Model:
-
stores a
UserPrefobject that represents the user’s preferences. -
stores the Address Book data.
-
exposes an unmodifiable
ObservableList<ReadOnlyPerson>that can be 'observed' e.g. the UI can be bound to this list so that the UI automatically updates when the data in the list change. -
does not depend on any of the other three components.
3.5. Storage component

Figure 3.5.1 : Structure of the Storage component
Figure 3.5.1 shows the structure of the Storage component.
API : Storage.java
The Storage component:
-
can save
UserPrefobjects in json format and read it back. -
can save the Address Book data in xml format and read it back.
3.6. Common classes
Classes used by multiple components are in the seedu.addressbook.commons package.
4. Implementation
This section describes some noteworthy details on how certain features are implemented.
4.1. Undo/Redo mechanism
The undo/redo mechanism is facilitated by an UndoRedoStack, which resides inside LogicManager. It supports undoing and redoing of commands that modifies the state of the address book (e.g. add, edit). Such commands will inherit from UndoableCommand.
UndoRedoStack only deals with UndoableCommands. Commands that cannot be undone will inherit from Command instead.

Figure 4.1.1: Inheritance diagram for commands
As you can see from Figure 4.1.1, UndoableCommand adds an extra layer between the abstract Command class and concrete commands that can be undone, such as the DeleteCommand. Note that extra tasks need to be done when executing a command in an undoable way, such as saving the state of the address book before execution. UndoableCommand contains the high-level algorithm for those extra tasks while the child classes implements the details of how to execute the specific command. Note that this technique of putting the high-level algorithm in the parent class and lower-level steps of the algorithm in child classes is also known as the template pattern.
Commands that are not undoable are implemented this way:
public class ListCommand extends Command {
    @Override
    public CommandResult execute() {
        // ... list logic ...
    }
}
With the extra layer, the commands that are undoable are implemented this way:
public abstract class UndoableCommand extends Command {
    @Override
    public CommandResult execute() {
        // ... undo logic ...

        executeUndoableCommand();
    }
}

public class DeleteCommand extends UndoableCommand {
    @Override
    public CommandResult executeUndoableCommand() {
        // ... delete logic ...
    }
}
Suppose that the user has just launched the application. The UndoRedoStack will be empty at the beginning.
The user executes a new UndoableCommand, delete 5, to delete the 5th person in the address book. The current state of the address book is saved before the delete 5 command executes. The delete 5 command will then be pushed onto the undoStack (the current state is saved together with the command). This is shown in Figure 4.1.2a.

Figure 4.1.2a: Adding a new UndoableCommand to an UndoRedoStack that is empty
As the user continues to use the program, more commands are added into the undoStack. For example, the user may execute add n/David … to add a new person. This is shown in Figure 4.1.2b.

Figure 4.1.2b: Adding another UndoableCommand to UndoRedoStack that is not empty
If a command fails its execution, it will not be pushed to the UndoRedoStack at all.
|
The user now decides that adding the person was a mistake, and decides to undo that action using undo.
We will pop the most recent command out of the undoStack and push it back to the redoStack. We will restore the address book to the state before the add command executed. This is shown in Figure 4.1.2c.
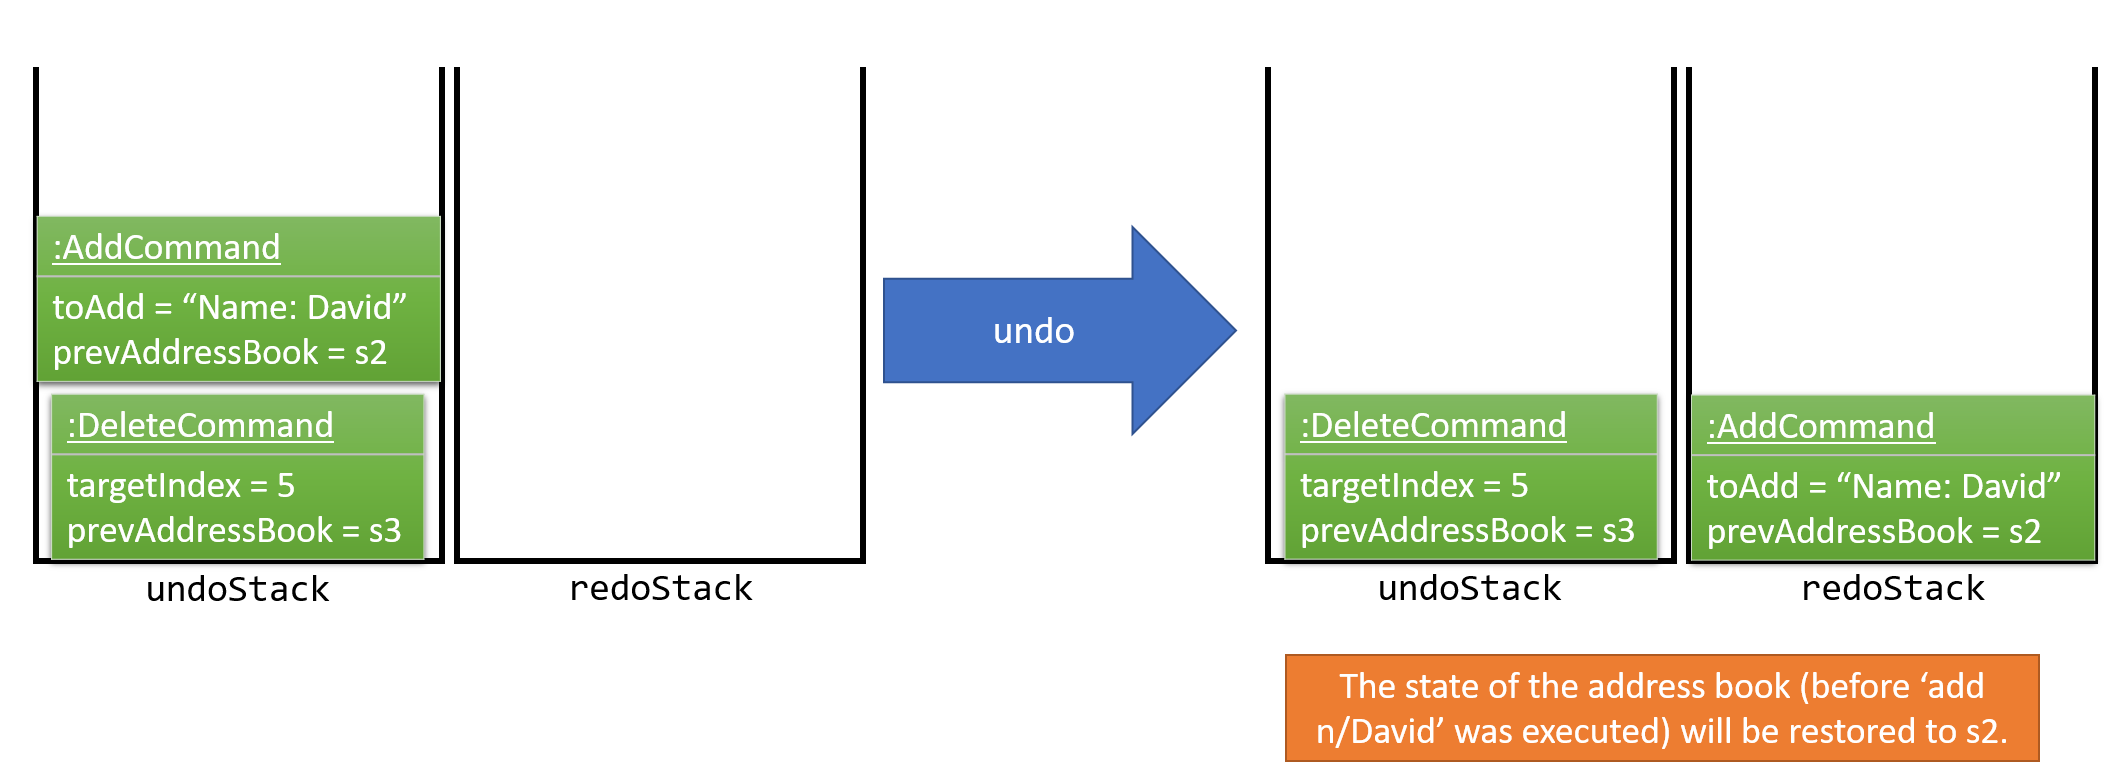
Figure 4.1.2c: Undoing a command
If the undoStack is empty, then there are no other commands left to be undone, and an Exception will be thrown when popping the undoStack.
|
Figure 4.1.2d shows how the undo operation works:
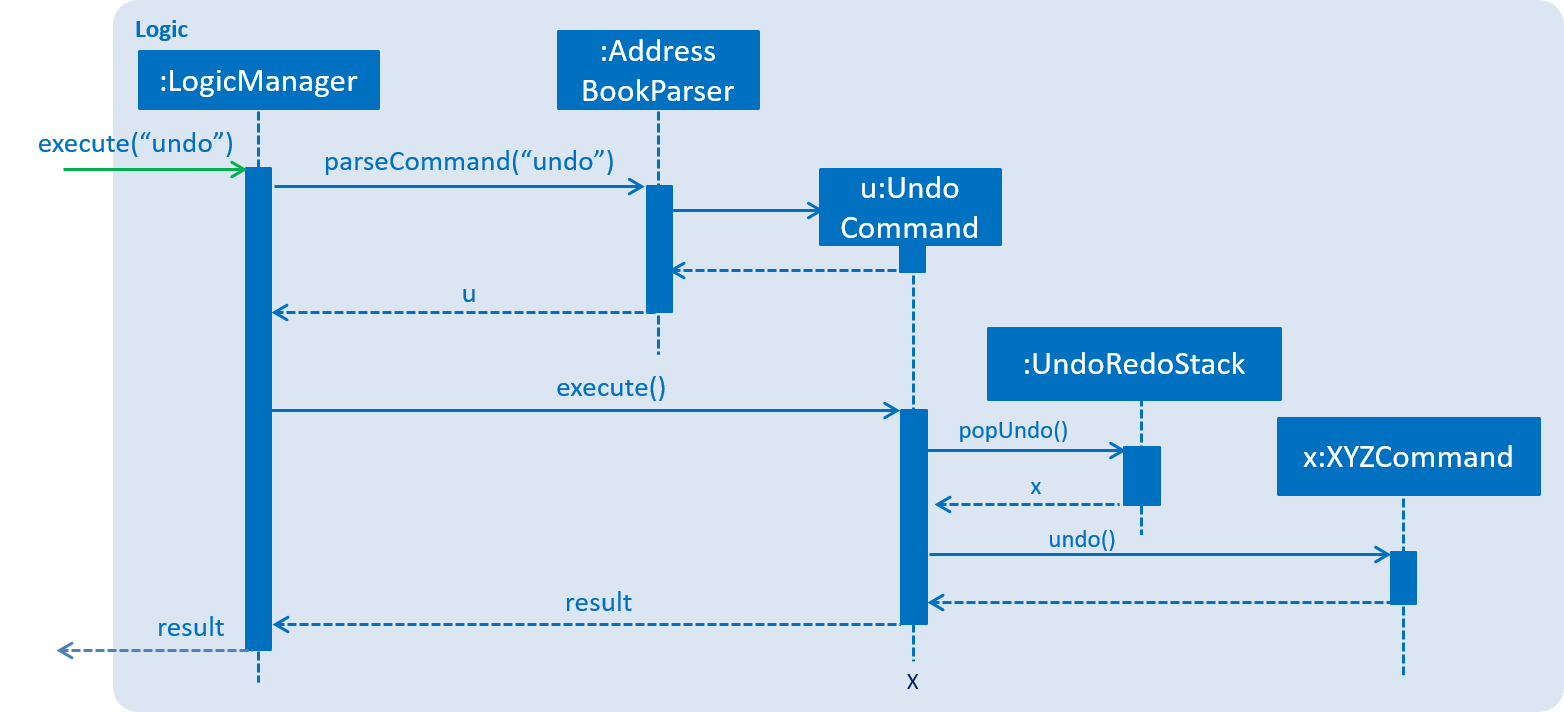
Figure 4.1.2d: Sequence diagram for Undo command
The redo does the exact opposite (pops from redoStack, push to undoStack, and restores the address book to the state after the command is executed).
If the redoStack is empty, then there are no other commands left to be redone, and an Exception will be thrown when popping the redoStack.
|
The user now decides to execute a new command, clear. As before, clear will be pushed into the undoStack. This time the redoStack is no longer empty. It will be purged as it no longer make sense to redo the add n/David command. This is shown in Figure 4.1.2e.

Figure 4.1.2e: Adding a new command when redoStack is not empty
Commands that are not undoable are not added into the undoStack. For example, list, which inherits from Command rather than UndoableCommand, will not be added after execution. This is shown in Figure 4.1.2f.

Figure 4.1.2f: Executing a non-undoable command
Figure 4.1.2g below summarizes what happens inside the UndoRedoStack when a user executes a new command:
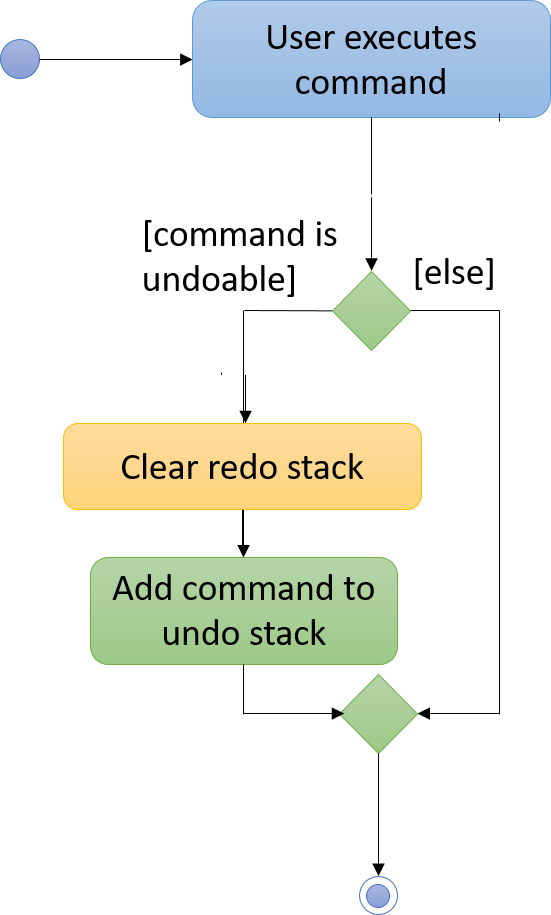
Figure 4.1.2g: UndoRedoStack activity diagram
4.1.1. Design Considerations
Aspect: Implementation of UndoableCommand
Alternative 1 (current choice): Add a new abstract method executeUndoableCommand()
Pros: We will not lose any undone/redone functionality as it is now part of the default behaviour. Classes that deal with Command do not have to know that executeUndoableCommand() exist.
Cons: Hard for new developers to understand the template pattern.
Alternative 2: Just override execute()
Pros: Does not involve the template pattern, easier for new developers to understand.
Cons: Classes that inherit from UndoableCommand must remember to call super.execute(), or lose the ability to undo/redo.
Aspect: How undo & redo executes
Alternative 1 (current choice): Saves the entire address book
Pros: Easy to implement.
Cons: May have performance issues in terms of memory usage.
Alternative 2: Individual command knows how to undo/redo by itself
Pros: Will use less memory (e.g. for delete, just save the person being deleted).
Cons: We must ensure that the implementation of each individual command are correct.
Aspect: Type of commands that can be undone/redone
Alternative 1 (current choice): Only include commands that modifies the address book (e.g. add, clear, edit)
Pros: We only revert changes that are hard to change back (the view can easily be re-modified as no data are lost).
Cons: User might think that undo also applies when the list is modified (undoing filtering for example), only to realize that it does not do that, after executing undo.
Alternative 2: Include all commands
Pros: Might be more intuitive for the user.
Cons: User have no way of skipping such commands if he or she just want to reset the state of the address book and not the view.
Additional Info: See our discussion here.
Aspect: Data structure to support the undo/redo commands
Alternative 1 (current choice): Use separate stack for undo and redo
Pros: Easy to understand for new Computer Science student undergraduates to understand, who are likely to be the new incoming developers of our project.
Cons: Logic is duplicated twice. For example, when a new command is executed, we must remember to update both HistoryManager and UndoRedoStack.
Alternative 2: Use HistoryManager for undo/redo
Pros: We do not need to maintain a separate stack, and just reuse what is already in the codebase.
Cons: Requires dealing with commands that have already been undone: We must remember to skip these commands. Violates Single Responsibility Principle and Separation of Concerns as HistoryManager now needs to do two different things.
4.2. Borrow/payback command mechanism
The borrow command allows users to increase the debt of a person should he/she borrow more money. On the other hand, when a debtor repays a specified amount, the payback command is used to deduct that amount from his/her current debt. The BorrowCommand and PaybackCommand classes, which handle the updating of the Debt fields in a Person object, extend UndoableCommand so that both of these commands can be undone or redone if necessary.
These two commands require one compulsory argument which is the amount that is borrowed/paid back. Indicating the index (as listed in the person list panel on the left side of the application window) of the person who borrowed or paid back money is optional. If no index is specified, the command will be executed for the person that is currently selected in the person list.
The arguments (index and amount borrowed/paid back) are separated by a whitespace instead of special prefixes (e.g. prefix n/ used for name). Hence, the String#split method is used to tokenize the input using a single whitespace as the delimiter. As seen in Figure 4.2.1, the tokenized inputs (index and amount borrowed) are then converted to their appropriate Object types and supplied as arguments to the BorrowCommand constructor. Input for the payback command is tokenized and supplied to the PaybackCommand constructor in the same manner.
The BorrowCommand and PaybackCommand are executed in LogicManager.
BorrowCommand updates the debt, totalDebt and dateRepaid attributes in the target Person object through the ModelManager#addDebtToPerson() which calls AddressBook#addDebtToPerson(). A new Person object is then created with the updated debt and totalDebt amount. Also, the dateRepaid field is set to NOT REPAID. The target Person object is then replaced with this new Person object.
PaybackCommand updates the target person’s debt in the same manner as the BorrowCommand. However, only the debt attribute is updated. If the person has fully repaid his/her debts, the PaybackCommand will set the date repaid to the day the PaybackCommand was executed. The person will also be listed in the whitelist.
For the BorrowCommand, the DateBorrow field in the new Person object needs to be updated to match the DateBorrow field in the target Person object. This is because the date of creation of the Person object is assigned to the DateBorrow field when a Person object is created.
|
The following sequence diagram, Figure 4.2.1, shows further details of the interaction between the Logic and Model component when the borrow command is executed:
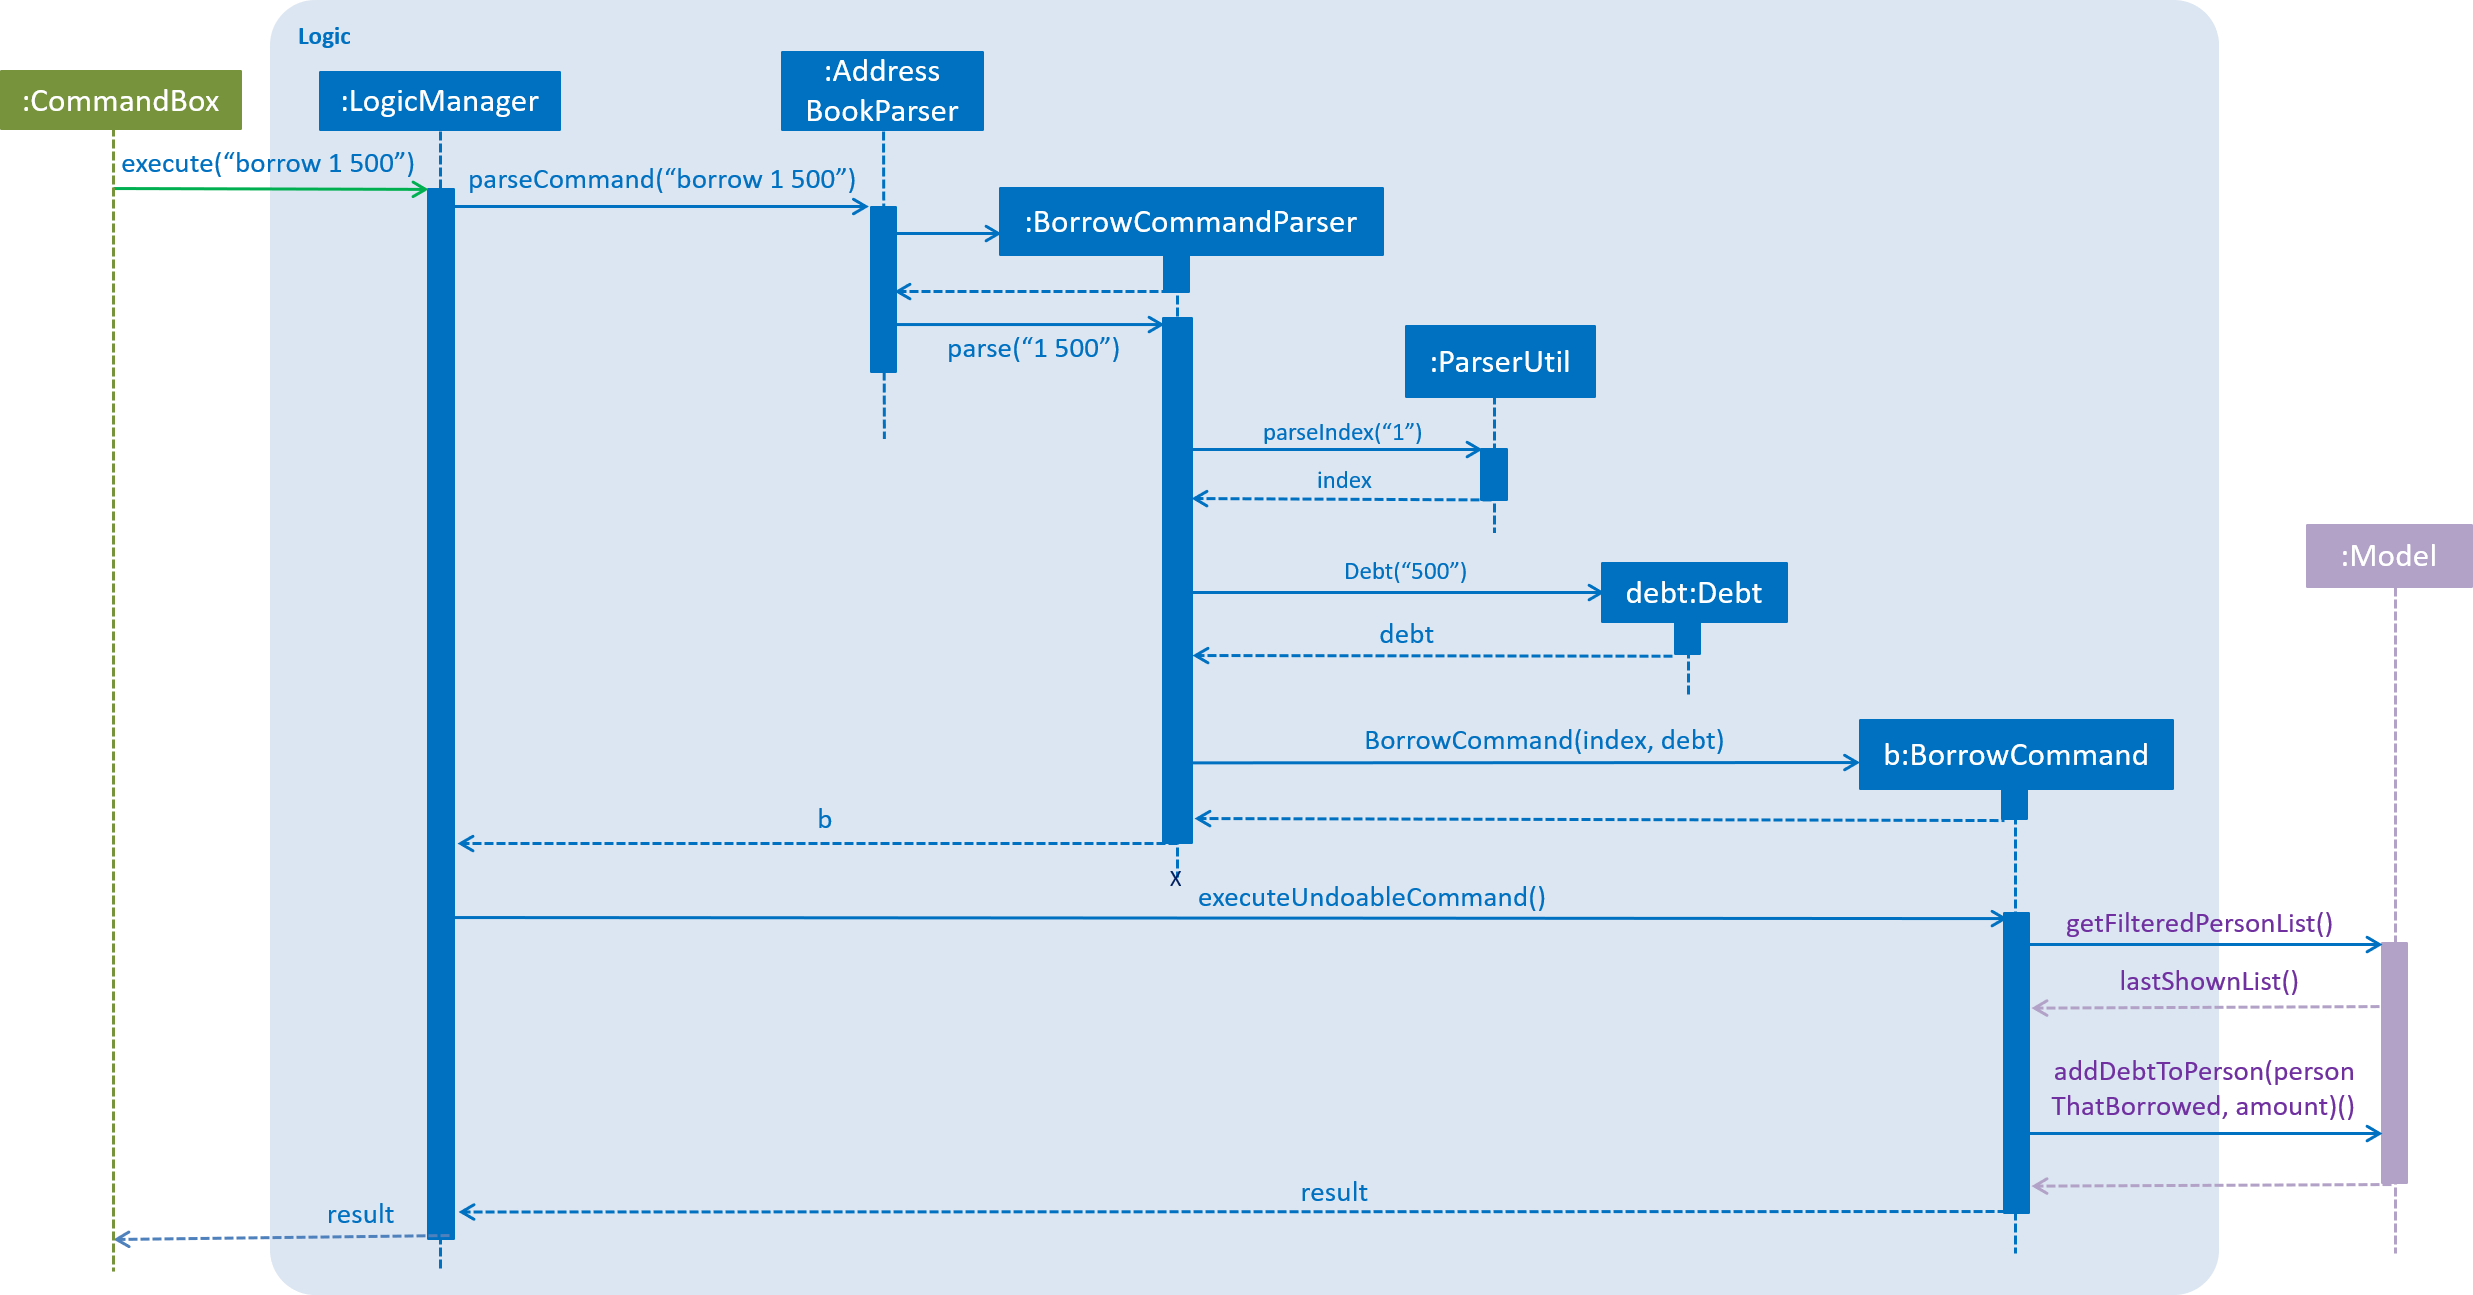
Figure 4.2.1 : Sequence diagram of how the borrow command works
The payback command works in a similar way to the borrow command.
4.2.1. Design Considerations
Aspect: Implementation of BorrowCommandParser and PaybackCommandParser
Alternative 1 (current choice): Tokenize arguments using String#split()
Pros: Easier to parse arguments using String#split method since there are no prefixes in the command input. It is also easier to validate the number of arguments entered by the user. This can be done through checking the length of the String array returned by String#split.
Alternative 2: Modify ArgumentTokenizer#tokenize() to tokenize arguments
Pros: Better modularity.
Cons: Requires modifications to ArgumentTokenizer#tokenize() since supplying whitespace as a prefix to the current ArgumentTokenizer#tokenize() method incorrectly tokenizes arguments.
For example:
Entered command: borrow 1 500
Prefix supplied to ArgumentTokenizer#tokenize method: " "
Outcome: prefix " " will be mapped to 1 500 in argMultimap. Index and amount borrowed are not separated.
Aspect: Updating Debt field
Alternative 1 (current choice): Create a new Person object, called editedPerson, by supplying the target ReadOnlyPerson object to constructor Person::new
Pros: Straightforward and simple to implement.
Cons: Debt class will need to have another constructor that takes in a Double parameter for simpler implementation of AddressBook#addDebtToPerson().
Alternative 2: Reusing the AddressBook#updatePerson() method
Pros: Do not have to write the method from scratch.
Cons: A new Person object still has to be created in order to edit the Debt field. Since Addressbook#updatePerson() only accepts ReadOnlyPerson objects as parameters, more code has to be written to convert the Person object to be a ReadOnlyPerson object.
4.3. Backup storage mechanism
The backup storage mechanism is facilitated by the StorageManager. It backs up the address book data automatically each time the application starts up, if there is existing data available. The sequence diagram for this is shown below in Figure 4.3.
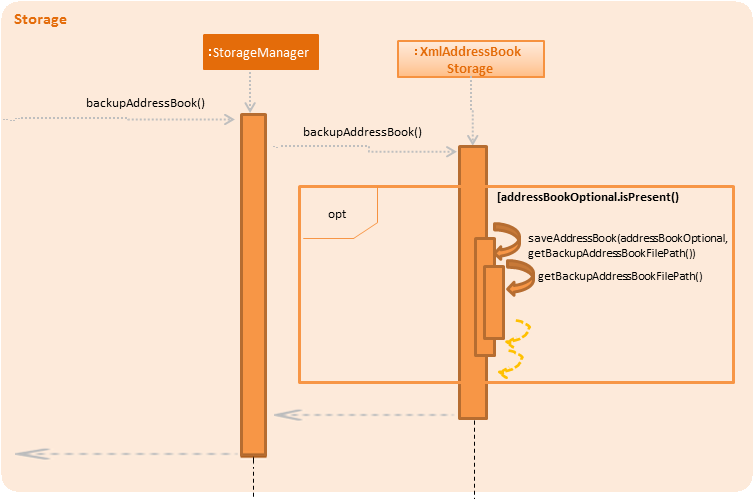
Figure 4.3.1: Sequence diagram for backing up address book data
The backupAddressBook method is called in MainApp#init() which is called each time the application starts. No backup is made if there is no existing data.
4.3.1. Design Considerations
Aspect: When to create the backup
Alternative 1 (current choice): Create it on application start up
Pros: Guarantees that a backup is made only of a working version of the address book that the user can easily revert to, should he/she mess up the main copy while using the application.
Cons: Not suitable for users who tend to make many changes within one session, as too many changes will not be backed up.
Alternative 2: Implement a command to create backup
Pros: The backup is only created when the user desires to.
Cons: This makes the implementation pointless altogether as it is meant as a safety net for clumsy users. This alternative would only benefit the careful users, who do not require it as much in the first place.
Alternative 3: Create a backup after a fixed number of commands that change the address book
Pros: This will create backups that are guaranteed to be recent.
Cons: It is difficult to determine the ideal number of commands to ensure that the backup is both recent enough, yet outdated enough for the user to want to restore state to should he/she mess up a command at some point.
4.4. Date storing mechanism
The date storing mechanism only begins to work when an instance of the Person class is implemented. An instance of the Date class is created and used to store the current date that the Person instance was created.
An example of such an implementation of this is the dateBorrow field of Person.
public class Person implements ReadOnlyPerson {

    private ObjectProperty<Name> name;
    private ObjectProperty<Phone> phone;
    private ObjectProperty<Email> email;
    private ObjectProperty<Address> address;
    private ObjectProperty<PostalCode> postalCode;
    private ObjectProperty<Cluster> cluster;
    private ObjectProperty<Debt> debt;
    private ObjectProperty<Interest> interest;
    private ObjectProperty<DateBorrow> dateBorrow;
Such an implementation doesn’t allow for errors when creating the field as there is no room for mistakes on the user’s side. When the Person instance is created, the following line is called:
this.dateBorrow = new SimpleObjectProperty<>(new DateBorrow());Suppose the above line is called, the DateBorrow class creates a new Date with the following line:
    public DateBorrow() {
        Date date = new Date();
        value = formatDate(date);
    }
This way of implementation is rather intuitive when adding a new Person as a new Date can simply be created. However, whenever a Person constructor is called, such as the following:
    public Person(ReadOnlyPerson source) {
        this(source.getName(), source.getPhone(), source.getEmail(), source.getAddress(), source.getPostalCode(),
                source.getDebt(), source.getInterest(), source.getDeadline(), source.getTags());
This would result in inconsistencies in the code. For example, an Edit command is implemented in such a way that it creates an editedPerson.
This is because the above mentioned constructor was meant to make a copy of the Person with a given source. Hence the following line was added to ensure consistency.
this.dateBorrow = new SimpleObjectProperty<>(source.getDateBorrow());4.4.1. Design Considerations
Aspect: Implementation of DateBorrow
Alternative 1(current choice): Create a DateBorrow class as such but modify the constructor to maintain consistency
Pros: Blends well with existing coding style and how the commands work.
Cons: As of now there is no problems with the implementation.
Alternative 2: Have the user manually key in the date
Pros: Implementation is very simple as the developer could just follow current coding style to create a new field.
Cons: Such an implementation would not be as user-friendly as the first alternative. Currently the amount of fields for the user to key in
is rather high. Implementing alternative 2 would be more tedious on the user’s side.
4.5. List (Masterlist, Blacklist, etc.) mechanism
Having multiple lists is useful for debt collectors to view debtors of different categories. Currently, these different lists include masterlist and blacklist.
These lists could be viewed with the respective commands that will update the panel that is currently displayed. The commands to display these lists are named after the lists themselves. For example, to view the blacklist, the command typed is "blacklist" or "bl".
The following sequence diagram, Figure 4.5.1, shows further details of the interaction between the user and various application components as a whole, when the blacklist command is executed:
Figure 4.5.1 : Sequence diagram of how the blacklist command works
The following sequence diagram, Figure 4.5.2, shows further details of the interaction between ModelManager and ReadOnlyAddressBook to obtain the blacklist:
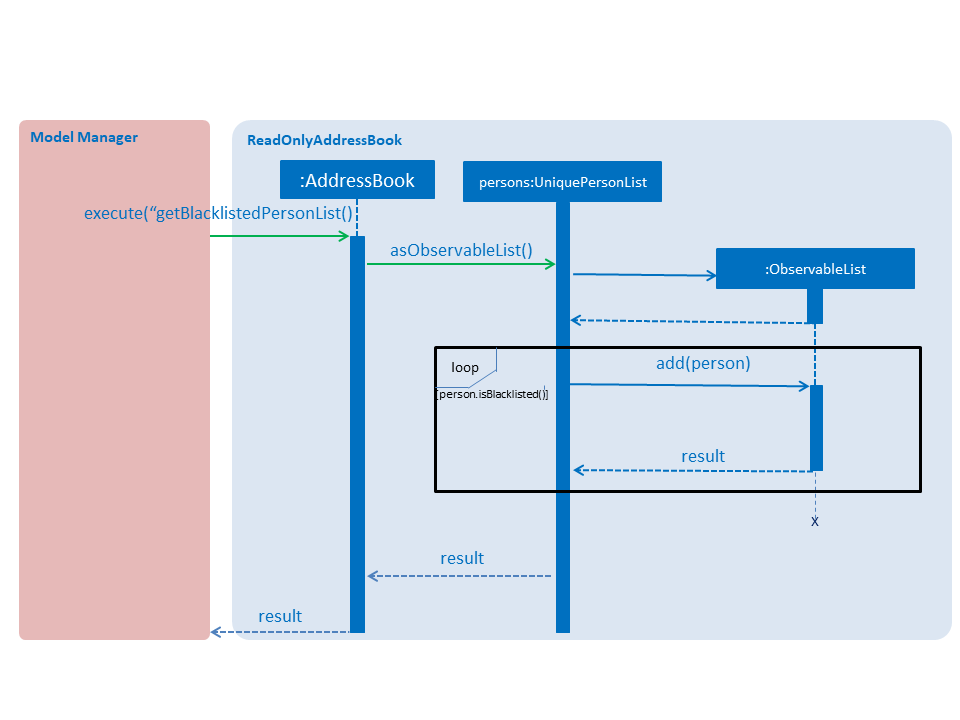
Figure 4.5.2 : Sequence diagram of how ModelManager interacts with ReadOnlyAddressBook to generate blacklist from all persons
The List mechanism is facilitated by commands which use Logic interface to obtain the copy of the list that is required. As seen from Figure 4.5.1 and Figure 4.5.2 above, to obtain the current blacklist of the addressbook, "blacklist" String is first captured by the CommandBox class. The CommandBox class then passes this String to the Logic interface for execution.
Logic interface uses LogicManager class to validate the written command and package it as a Command object. The respective command is then executed in LogicManager class. These are the instructions that are executed for this command:
@Override
public CommandResult execute() {
    requireNonNull(model);
    model.deselectPerson();
    model.changeListTo(COMMAND_WORD);
    model.updateFilteredBlacklistedPersonList(PREDICATE_SHOW_ALL_BLACKLISTED_PERSONS);
    String currentList = ListObserver.getCurrentListName();
    return new CommandResult(currentList + MESSAGE_SUCCESS);
}
Specifically for blacklist command, it calls the getFiltererdBlacklistedPersons() method residing in the Logic interface. LogicManager subsequently calls Model interface. Model uses ModelManager class to handle the command and thereafter calls ReadOnlyAddressBook interface to handle the request. ReadOnlyAddressBook uses AddressBook class to handle this request.
In the AddressBook class, there is only one persons variable that stores all ReadOnlyPerson class objects. The blacklisted persons are obtained by running a check on all debtors residing in this variable. The check is executed using the asObservableBlacklist() method, as shown below:
public ObservableList<ReadOnlyPerson> asObservableBlacklist() {
    return FXCollections.unmodifiableObservableList(mappedList.stream()
            .filter(person -> person.isBlacklisted()).collect(toCollection(FXCollections::observableArrayList)));
}
Although this way of implementation seems inefficient, it supports robust synchronisation among the various other lists. For example, if a person is deleted from the masterlist, he will also be deleted from the blacklist. Likewise for various other commands that changes the ReadOnlyPerson object. Thus, it is efficient in this aspect. Moreover, this implementation sets the groundwork for future implementations of various other lists.
One other important aspect to this implementation is that commands now have exclusive control over the list. This means that commands will only work on the persons in the current displayed list. For example, find command will only search and find persons in the current displayed list. It will not try to search in the masterlist, where all the contacts are stored. sort command will only sort the persons in the current displayed list. If the current displayed list is the blacklist, the output of the sort command will just be a list of sorted blacklisted persons.
However, if a Person is modified by a command, the modification will be reflected across all other lists. For example, if a person exists in both the blacklist and the overdue list, modifications done by an edit command in the blacklist will also update the overdue list. These changes can be observed when the user switches to the overdue list using the overduelist command.
4.5.1. Design Considerations:
Aspect: Syncing of lists
Alternative 1 (current choice): Use manual syncing methods to ensure lists are in sync
Pros: Easy to extend for future implementations.
Cons: Methods used for syncing are less intuitive and difficult to comprehend.
Alternative 2: Create new persons variable for each list in Addressbook class
Pros: Implementation is easier to comprehend.
Cons: Waste of memory compared to current implementation which only has 1 persons variable in Addressbook class.
4.6. Cluster mechanism
As a debt collector that operates in all parts of Singapore, it would boost efficiency in deciding debt collection trips
if the contacts can be effectively grouped by clusters. It is determined based on the postal code provided
upon adding a Person into the address book. This can be seen in the constructors of the Person class and the
Cluster class.
public Person(Name name, Phone phone, Email email, Address address, PostalCode postalCode,
              Debt debt, Interest interest, Deadline deadline, Set<Tag> tags) {
    requireAllNonNull(name, phone, email, address, postalCode, debt, interest, deadline, tags);
    // assignment of other fields omitted for brevity
    this.cluster = new SimpleObjectProperty<>(new Cluster(postalCode));
}
public Cluster(PostalCode postalCode) {
requireNonNull(postalCode);
if (!isValidPostalCode(postalCode.toString())) {
throw new AssertionError(MESSAGE_POSTAL_CODE_CONSTRAINTS);
}
String cluster = getCluster(postalCode.toString());
clusterNumber = Integer.parseInt(cluster.substring(0, 2));
this.value = cluster.substring(4);
}The getCluster method resides in the ClusterUtil class, and returns the name of the postal district based on the
first two numbers of the postal code that is passed into the method. The postal districts are retrieved from [URA].
The district number is stored as part of the String for ease of sorting by location.
Part of the code from ClusterUtil for retrieving the cluster from a postal code starting with 01 is shown below:
public class ClusterUtil {

    public static final String CLUSTER_POSTAL_DISTRICT_01 = "01. Raffles Place, Cecil, Marina, People's Park";
    // declaration of other postal districts omitted for brevity
    public static final String CLUSTER_POSTAL_DISTRICT_UNKNOWN = "99. Unknown";

    public static String getCluster(String postalCode) {
        requireNonNull(postalCode);
        int postalSector = Integer.parseInt(postalCode.substring(0, 2));
        switch (postalSector) {
        case 1:
        case 2:
        case 3:
        case 4:
        case 5:
        case 6:
            return CLUSTER_POSTAL_DISTRICT_01;
        // cases for all other valid postal districts omitted for brevity
        default:
            return CLUSTER_POSTAL_DISTRICT_UNKNOWN;
        }
    }
}
4.6.1. Design Considerations
Aspect: Grouping of contacts
Alternative 1 (current choice): Create a field that contains the name and district number of the postal districts, based on postal code
Pros: Easy to implement and extend, requires minimal user input.
Cons: Requires developer to update ClusterUtil whenever a new postal district is drawn by the government, and
requires users to reset their contacts' cluster via deletion and addition or via editing their postal codes.
Alternative 2: Import contacts' location and find their proximity from one another using Google Maps API
Pros: Higher precision of geographical location and proximity.
Cons: Tedious to implement proximity. Either takes up too much time in generating nearby contacts or too much space
in storing them.
Alternative 3: Assign general location to each contact upon addition into the address book or via editing
Pros: Easy to implement.
Cons: Tedious for users. They also have to ensure that they do not make spelling mistakes.
4.7. Filter by tags mechanism
The filter command allows the user to filter contacts by tags. Multiple tags can be entered. The command returns a list of contacts that match at least one of the tags that is specified by the user.
Since the filtered person list stored in the ModelManager class is of the type FilteredList<>, filtering of the list can be done easily using Java’s FilteredList#setPredicate() method.
Hence, a PersonContainsTagPredicate is created to check if a Person object contains the tags of interest. The code snippet below shows how the PersonContainsTagPredicate is implemented to sieve out the relevant contacts. The Stream#anyMatch() method ensures that the filtered list contains persons who have at least one tag specified by the user.
/**
 * Evaluates this predicate on the given {@code person}. This predicate tests if a person contains at least one tag
 * from {@code tagKeywords}.
 * @return {@code true} if the person matches the predicate,
 * otherwise {@code false}
 */
@Override
public boolean test(ReadOnlyPerson person) {
    Set<Tag> tagList = person.getTags();
    for (Tag tag : tagList) {
        if (tagKeywords.stream().anyMatch(keyword -> StringUtil.containsWordIgnoreCase(tag.tagName, keyword))) {
            return true;
        }
    }
    return false;
}
The list is filtered and updated through ListObserver#updateCurrentFilteredList() in the seedu.addressbook.commons package, instead of ModelManager#updateFilteredPersonList(), so that it works across all lists (masterlist, blacklist, whitelist and overdue list).
4.7.1. Design Considerations
Aspect: Implementation of PersonContainsTagPredicate
Alternative 1 (current choice): Predicate returns true if at least one tag matches the list of tags specified by the user
Pros: More contacts will be shown to the user. The additional information may be useful to the user.
Cons: The user may find some of the filtered contacts irrelevant.
Alternative 2: Predicate returns true only if the person contains the exact tags that are specified by the user
Pros: Shows the most relevant results if the user wants to search for an exact match.
Cons: If the contacts have multiple tags and the user remembers just one of the tags wrongly, the filter command will return zero results.
4.8. Login/logout mechanism
Although there are two versions for login, the Graphic User Interface(GUI) version and the Command Line Interface(CLI) version, they both use the same login mechanism (see Figure 4.8.1 below). The GUI login is recommended over the CLI login because it has better password masking capabilities.
This is because the password field in the GUI login is implemented using JavaFX 8’s PasswordField. The CLI login exists, despite the inconsistent password masking, to allow the user to log into the app faster since using a one-shot command is faster than a multi-step command.
The bugs in the CLI login could be resolved by removing password masking. However, this would have security implications because the password is not concealed.
After a user logs in using either the CLI or GUI login, verification of the login information will take place in the Model component. The username and password are verified against the information stored in preferences.json.
The password is stored as a SHA-512 hash to conceal the actual password. The salt that is used to generate the hashed password is also stored. Since the stored hash cannot be converted back to the original password, the password that is entered by the user needs to be hashed and verified against the stored hash. Thus, the same salt needs to be used to generate a hash to match with the stored hash. If a different salt is used, then the generated hash will be different from the stored hash even if the password provided is correct.
After verifying that the username and password matches the information stored in preferences.json, an event is raised to notify the UI component of the user authentication result. If the user has successfully logged in, the UI component will display the person list, info panel and allow other commands (such as list, edit, `add, etc.) to be executed from the command box.
The activity diagram below, Figure 4.8.1, shows the overall flow of the command execution for both GUI and CLI login:
image::LoginActivityDiagram.PNG[width="800"]
Figure 4.8.1 : Activity diagram of how the login command works for both CLI and GUI version
When a user enters the logout command, the LogoutCommand class in the Logic component will call the ModelManager#logout() method. Two events will be raised: LoginAppRequestEvent and LogoutAppRequestEvent. LoginAppRequestEvent is to set the isLoggedIn variable in LoginCommand to false and LogoutAppRequestEvent is to set the isLoggedOut variable in LogoutCommand to true. Both events need to be raised to notify the UI component to go back to the welcome page and restrict the commands that are allowed to be executed. Upon logout, the command history and undo/redo stacks are cleared.
4.8.1. Design Considerations
Aspect: Implementation of password masking
Alternative 1(current choice): Use the unicode character 'BLACK CIRCLE' (●) for password masking
Pros: Other characters can be detected as password input, such as the asterisk character '*' which is commonly used for password masking.
Alternative 2: Use the asterisk character (*) for password masking
Pros: User may use the asterisk character when entering the password. The asterisk character will be ignored and will not show in the text field when it is entered. This is because the method that handles password masking ignores the character used to mask the password. Refer to the code snippet below for the implementation:
/*
 * mask password after the second whitespace and prevent the reading of the BLACK_CIRCLE after replacing
 * a character in the command box text field with a BLACK_CIRCLE
 */
if (numOfSpaces >= 2 && currentInput.charAt(currentInput.length() - 1) != ' '
        && currentInput.charAt(currentInput.length() - 1) != BLACK_CIRCLE) {
    maskPasswordInput(currentInput);
}
Cons: Although '*' is an invalid password character, the user may still use it while entering the password. Hence, if the user types '*', the cursor will remain at its original position. The user will be under the impression that the command box is not registering what was typed.
4.9. Sorting mechanism
Sorting is done within the UniquePersonList class.
public void sortBy(String order) throws IllegalArgumentException {
    switch (order) {
    case "name":
        internalList.sort((Person p1, Person p2) -> p1.getName().compareTo(p2.getName()));
        break;
    case "debt":
        internalList.sort((Person p1, Person p2) -> p2.getDebt().compareTo(p1.getDebt()));
        break;
    case "cluster":
        internalList.sort((Person p1, Person p2) -> p1.getCluster().compareTo(p2.getCluster()));
        break;
    case "deadline":
        internalList.sort((Person p1, Person p2) -> p1.getDeadline().compareTo(p2.getDeadline()));
        internalList.sort((Person p1, Person p2) -> Boolean.compare(p1.isWhitelisted(), p2.isWhitelisted()));
        break;
    default:
        throw new IllegalArgumentException("Invalid sort ordering");
    }
}
The sort command can take in a String that determines how the contacts should be sorted. If no ordering is
specified, the contacts will be sorted by ascending lexicographical order by default.
public class SortCommandParser implements Parser<SortCommand> {
    public SortCommand parse(String args) throws ParseException {
        requireNonNull(args);
        String trimmedArgs = args.trim().toLowerCase();
        switch (trimmedArgs) {
        case "":
        case "name":
        case "debt":
        case "cluster":
        case "deadline":
            return new SortCommand(trimmedArgs);
        default:
            throw new ParseException(String.format(MESSAGE_INVALID_COMMAND_FORMAT, SortCommand.MESSAGE_USAGE));
        }
    }
}
public static final String DEFAULT_ORDERING = "name";
public SortCommand(String order) {
//validity of order to sort is checked in {@code SortCommandParser}
if (order.equals("")) {
order = DEFAULT_ORDERING;
}
this.order = order;
}
public CommandResult execute() throws CommandException {
try {
model.sortBy(order);
} // irrelevant parts of the method omitted for brevity
}4.9.1. Design considerations
Aspect: Default sort
Alternative 1 (current choice): Sort by name by default
Pros: Relatively easy to implement, extremely intuitive.
Alternative 2: Sort by debt by default
Pros: Equally easy to implement.
Cons: Slightly less intuitive as sorting by name is the most prevalent way of sorting contacts.
Alternative 3: No default sort
Pros: Extremely easy to implement.
Cons: Not user-friendly.
4.10. Optional command indexes
It is intuitive to allow commands such as edit, delete, borrow and others to be called on the currently selected
person instead of always having to supply the INDEX.
Parsers of commands call a constructor of the commands without an index. Take the RepaidCommandParser and RepaidCommand for example.
public RepaidCommand parse(String args) throws ParseException {
    try {
        if (args.trim().equals("")) {
            return new RepaidCommand();
        } else {
            Index index = ParserUtil.parseIndex(args);
            return new RepaidCommand(index);
        }
    } catch (IllegalValueException ive) {
        throw new ParseException(
            String.format(MESSAGE_INVALID_COMMAND_FORMAT, RepaidCommand.MESSAGE_USAGE));
    }
}
public RepaidCommand() throws CommandException {
personToWhitelist = selectPersonForCommand();
}
public RepaidCommand(Index targetIndex) throws CommandException {
personToWhitelist = selectPersonForCommand(targetIndex);
}The selectPersonForCommand() and selectPersonForCommand(Index) methods are placed in the Command class, and is used by such index-based commands to select
the currently selected person to apply the command on if no index is provided.
public ReadOnlyPerson selectPersonForCommand() throws CommandException {
    if (ListObserver.getSelectedPerson() == null) {
        throw new CommandException(Messages.MESSAGE_NO_PERSON_SELECTED);
    }
    return ListObserver.getSelectedPerson();
}

public ReadOnlyPerson selectPersonForCommand(Index index) throws CommandException {
    List<ReadOnlyPerson> lastShownList = ListObserver.getCurrentFilteredList();
    if (index.getZeroBased() >= lastShownList.size()) {
        throw new CommandException(Messages.MESSAGE_INVALID_PERSON_DISPLAYED_INDEX);
    }
    return lastShownList.get(index.getZeroBased());
}
4.10.1. Design Considerations
Aspect: Executing index-based commands without index
Alternative 1 (current choice): The person to apply the commands on are determined in the constructors
Pros: Allows for proper redo.
Cons: Hard to test as Command Exceptions are being thrown from the constructors.
Alternative 2: Calling a constructor of the command without an Index initialises its targetIndex
to null, and the null index is handled as a special value during execution
Pros: Easy to implement, easy to extend.
Cons: Although highly unlikely, it may be possible for a command to have an unintended null targetIndex, which
will then cause it to behave as an indexless command instead of an error. May also cause problems with redo.
4.11. Interest Calculator Mechanism
As a debt collector, it can be troublesome to manage so many debts. The task is made more tedious when the debt collector has to
consider all the debtor’s loan’s interest rates as well. Codii is able to automatically calculate a Person 's new debt based on his / her’s
interest rate. Whenever the user logs into Codii, the Model component, which handles the event LoginAppRequestEvent and checks every
Person in the AddressBook.
@Subscribe
    public void handleLoginUpdateDebt(LoginAppRequestEvent event) {
        // login is successful
        if (event.getLoginStatus() == true) {
            for (ReadOnlyPerson person : allPersons) {
                if (!person.getInterest().value.equals("No interest set.")
                        && (person.checkLastAccruedDate(new Date()) != 0)) {
                    updateDebtFromInterest(person, person.checkLastAccruedDate(new Date()));
                }
            }
        }
    }
As seen from the above if a Person has his / her interest field defined,the event handler checks a Person 's debts last accrued date via the method:
    /**
     * Compares date of last accrued against current date.
     * @return number of months the current date is ahead of last accrued date. Returns 0 if
     * there is no need to increment debt.
     */
    @Override
    public int checkLastAccruedDate(Date currentDate) {
        if (lastAccruedDate.before(currentDate)) {
            return DateUtil.getNumberOfMonthBetweenDates(currentDate, lastAccruedDate);
        } else {
            return 0;
        }
    }
The above method returns the difference in the number of months between the last accrued date and the current date to the event handler. The event
handler than calls another method to update the Person 's debt by passing in the number of months as a parameter:
    @Override
    public void updateDebtFromInterest(ReadOnlyPerson person, int differenceInMonths) {
        String accruedAmount = person.calcAccruedAmount(differenceInMonths);
        try {
            Debt amount = new Debt(accruedAmount);
            addDebtToPerson(person, amount);
        } catch (PersonNotFoundException pnfe) {
            assert false : "Should not occur as person obtained from allPersons";
        } catch (IllegalValueException ive) {
            assert false : Debt.MESSAGE_DEBT_CONSTRAINTS;
        }
    }
From the above code, the Person 's debts accrued amount would be calculated by the line:
String accruedAmount = person.calcAccruedAmount(differenceInMonths);Their respective debts would then be updated accordingly with the following line:
addDebtToPerson(person, amount);4.11.1. Design Considerations
Aspect: When to update / check a Person’s debt
Alternative 1 (Current choice): Check through the AddressBook in the Model component every time the user logs in
Pros: Convenient and intuitive to implement for developer.
Cons: If user never logs out, the debt would not be accrued.
Alternative 2: Create a Refresh command that does the checking instead of relying on the LoginAppRequestEvent
Pros: User can have the most up-to-date debt as long as he / she remembers to always enter the Refresh command.
Cons: Not convenient for user at all. It is also unlikely that the user would remain logged in for such a long duration.
4.12. Theme Changing Mechanism
The changing of themes is done in the MainWindow class, which is the class that holds all the UI parts.
private void changeTheme() {
    for (String stylesheet : getRoot().getStylesheets()) {
        if (stylesheet.endsWith("DarkTheme.css")) {
            getRoot().getStylesheets().remove(stylesheet);
            getRoot().getStylesheets().add("/view/BrightTheme.css");
            break;
        } else if (stylesheet.endsWith("BrightTheme.css")) {
            getRoot().getStylesheets().remove(stylesheet);
            getRoot().getStylesheets().add("/view/DarkTheme.css");
            break;
        }
    }
}
The changeTheme method is called when a ChangeThemeRequestEvent is raised from ThemeCommand.
In MainWindow:
@Subscribe
private void handleChangeThemeRequestEvent(ChangeThemeRequestEvent event) {
    logger.info(LogsCenter.getEventHandlingLogMessage(event));
    changeTheme();
}
In ThemeCommand:
public CommandResult execute() {
    EventsCenter.getInstance().post(new ChangeThemeRequestEvent());
    return new CommandResult(MESSAGE_SUCCESS);
}
4.12.1. Design Considerations
Aspect: Condition for changing themes
Alternative 1 (current choice): Use String#endsWith()
Pros: Foolproof, guaranteed to work if the theme exists.
Alternative 2: Use file paths
Pros: Likely to work most of the time if handled well.
Cons: When debugging, it was found that the path started in the build folder instead of the src folder. Using
this method seemed to cause inconsistencies between running the app from an IDE and from the .jar file.
Aspect: Switching of themes
Alternative 1 (current choice): Simple toggle between two themes
Pros: Easy to implement.
Cons: Troublesome to extend.
Alternative 2: Use an int to keep track of the current theme, assign each theme to a number, and use + and %
to cycle through the themes
Pros: Easy to extend.
Cons: Troublesome to implement considering that we intend to use only two themes.
4.13. Repaid command mechanism
The repaid command allow users to indicate that the specified debtor has completely repaid all of his/her debt. The RepaidCommand extends UndoableCommand so that it can be undone and redone if necessary.
The command executes using the index of the person the user wishes to update. However, indicating the index is optional if the person is the current selected person in the person list panel, as the index is internally provided by the selected person card.
The RepaidCommand is executed in LogicManager. It checks if the person selected has already repaid all his/her debt. If the person has done so, the command will then throw an Exception indicating that he/she has already repaid his/her debt.
If the person has not completely repaid his/her debt, LogicManager will then call the Model interface to execute a three-step process on that person, using a single method. ModelManager will firstly reset the person’s debt to zero.
public ReadOnlyPerson resetPersonDebt(ReadOnlyPerson p) throws PersonNotFoundException {
    int index;
    index = persons.getIndexOf(p);

    Person existingPerson = new Person(p);
    try {
        existingPerson.setDebt(new Debt(Debt.DEBT_ZER0_VALUE));
    } catch (IllegalValueException e) {
        assert false : "The target value cannot be of illegal value";
    }

    persons.remove(p);

    try {
        persons.add(index, existingPerson);
    } catch (DuplicatePersonException dpe) {
        assert false : "There should be no duplicate when resetting the debt of a person";
    }

    return persons.getReadOnlyPerson(index);
}
Secondly, it will set the dateRepaid field of the person to the date the command was called.
public ReadOnlyPerson setDateRepaid(ReadOnlyPerson p) throws PersonNotFoundException {
    int index;
    index = persons.getIndexOf(p);

    Person existingPerson = new Person(p);
    existingPerson.setDateRepaid(new DateRepaid(formatDate(new Date())));

    persons.remove(p);

    try {
        persons.add(index, existingPerson);
    } catch (DuplicatePersonException dpe) {
        assert false : "There should be no duplicate when resetting the date repaid field of a person";
    }

    return persons.getReadOnlyPerson(index);
}
Finally, the person will be added into a list called Whitelist, given that he was not initially blacklisted.
public ReadOnlyPerson addWhitelistedPerson(ReadOnlyPerson p) {
    int index;
    index = persons.getIndexOf(p);

    Person newWhitelistedPerson = new Person(p);
    newWhitelistedPerson.setIsWhitelisted(true);
    try {
        updatePerson(p, newWhitelistedPerson);
    } catch (DuplicatePersonException e) {
        throw new AssertionError("The target person cannot be a duplicate");
    } catch (PersonNotFoundException e) {
        throw new AssertionError("This is not possible as prior checks have been done");
    }
    return persons.getReadOnlyPerson(index);
}
ModelManager will then return the updated ReadOnlyPerson Object back to LogicManager.
Aspect: Three-step process in one Command
Alternative 1 (current choice): The three-step process happens in a single method
Pros: Faster and simpler to implement the method.
Cons: Some methods will fail to update the person as intended. If the person is blacklisted, he/she will not be added into the whitelist.
Alternative 2: Include three separate methods in Model interface to execute the three-step process
Pros: Easy to observe the methods that will fail.
Cons: Methods in Model interface will seem to have less abstraction than intended.
4.14. Setpath/Addpic/Delpic command mechanism
Setpath, Addpic and Delpic commands facilitate updating a debtor’s display picture. Setpath command sets the path to a folder that contains JPG format images of the debtors. This folder resides in the user’s workspace.
The images in the folder must initially be named after the debtors themselves. For example, a debtor named Alex Yeoh should have an image titled AlexYeoh.jpg in this folder.
Setpath command modifies the destined path in the ProfilePicturesFolder class:
public CommandResult executeUndoableCommand() throws CommandException {
    ProfilePicturesFolder.setPath(reformatPath(path));
    return new CommandResult(MESSAGE_SUCCESS);
}
Addpic command takes in an index as the input and uses Logic interface to execute a two-step process to update the person’s display picture status. LogicManager calls Model interface to first search for the image in the path directory set by the SetPath command. This is done by first establishing the name of the image, and then searching for it in the required folder.
@Override
    public boolean addProfilePicture(ReadOnlyPerson person) throws ProfilePictureNotFoundException {
        String imageName = person.getName().toString().replaceAll("\\s+", "");
        File imageFile = new File(ProfilePicturesFolder.getPath() + imageName + JPG_EXTENSION);

        if (imageFile.exists()) {
            addressBook.addProfilePic(person);
            indicateAddressBookChanged();
            return true;
        } else {
            throw new ProfilePictureNotFoundException();
        }
    }
ModelManager checks if the image exists in the path directory. If it does, it will then set the boolean value of the person’s hasDisplayPicture variable to true.
public ReadOnlyPerson addProfilePic(ReadOnlyPerson person) {
        int index;
        index = persons.getIndexOf(person);

        Person newUpdatedPerson = new Person(person);
        newUpdatedPerson.setHasDisplayPicture(true);
        try {
            updatePerson(person, newUpdatedPerson);
        } catch (DuplicatePersonException e) {
            throw new AssertionError("The target person cannot be a duplicate");
        } catch (PersonNotFoundException e) {
            throw new AssertionError("This is not possible as prior checks have been done");
        }

        return persons.getReadOnlyPerson(index);
    }
When the PersonCard corresponding to the person is selected, hasDisplayPicture boolean value is obtained. If the value is true, the image will be retrieved from the previously set path. If it does not exist, a default image will be displayed.
public DebtorProfilePicture(ReadOnlyPerson person) {
        super(FXML);
        String imageName = person.getName().toString().replaceAll("\\s+", "");
        String imagePath = DEFAULT_PROFILEPIC_PATH;
        Image image = new Image(getClass().getResource(imagePath).toExternalForm());

        if (person.hasDisplayPicture()) {

            imagePath = ProfilePicturesFolder.getPath() + imageName + JPG_EXTENSION;
            File imageFile = new File(imagePath);

            if (!imageFile.exists()) {
                person.setHasDisplayPicture(false);
                raise(new MissingDisplayPictureEvent(person));
            } else {
                try {
                    image = new Image(imageFile.toURI().toURL().toExternalForm());
                } catch (MalformedURLException e) {
                    e.printStackTrace();
                }
            }
        }

        profilePic.setImage(image);
        profilePic.setFitWidth(450);
        profilePic.setFitHeight(450);
        profilePicPlaceHolder.setTopAnchor(this.getImageView(), 20.0);
        profilePicPlaceHolder.setRightAnchor(this.getImageView(), 50.0);
        registerAsAnEventHandler(this);
    }
Delpic command, similarly, resets the person’s hasDisplayPicture boolean value to false.
public ReadOnlyPerson removeProfilePic(ReadOnlyPerson person) {
        int index;
        index = persons.getIndexOf(person);

        Person newUpdatedPerson = new Person(person);
        newUpdatedPerson.setHasDisplayPicture(false);
        try {
            updatePerson(person, newUpdatedPerson);
        } catch (DuplicatePersonException e) {
            throw new AssertionError("The target person cannot be a duplicate");
        } catch (PersonNotFoundException e) {
            throw new AssertionError("This is not possible as prior checks have been done");
        }

        return persons.getReadOnlyPerson(index);
    }
Aspect: Storage of profile pictures in Codii
Alternative 1 (current choice): Images are not stored in Codii as they are read from the path directory provided by the user
Pros: Straightforward and simpler to implement.
Cons: Application cannot be easily transferred from one workstation to another.
Alternative 2: Store images in Codii similar to how XML files are stored
Pros: Far less hassle in transferring application content to another workstation.
Cons: The result of both implementations are very similar. However, this implementation is harder to execute.
4.15. Logging
We are using java.util.logging package for logging. The LogsCenter class is used to manage the logging levels and logging destinations.
-
The logging level can be controlled using the
logLevelsetting in the configuration file (See Configuration) -
The
Loggerfor a class can be obtained usingLogsCenter.getLogger(Class)which will log messages according to the specified logging level -
Currently log messages are output through:
Consoleand to a.logfile.
Logging Levels:
-
SEVERE: Critical problem detected which may possibly cause the termination of the application -
WARNING: Can continue, but with caution -
INFO: Information showing the noteworthy actions by the App -
FINE: Details that is not usually noteworthy but may be useful in debugging e.g. print the actual list instead of just its size
4.16. Configuration
Certain properties of the application can be controlled (e.g App name, logging level) through the configuration file (default: config.json).
5. Documentation
We use asciidoc for writing documentation.
| We chose asciidoc over Markdown because asciidoc, although a bit more complex than Markdown, provides more flexibility in formatting. |
5.1. Editing Documentation
See UsingGradle.adoc to learn how to render .adoc files locally to preview the end result of your edits.
Alternatively, you can download the AsciiDoc plugin for IntelliJ, which allows you to preview the changes you have made to your .adoc files in real-time.
5.2. Publishing Documentation
See UsingTravis.adoc to learn how to deploy GitHub Pages using Travis.
5.3. Converting Documentation to PDF format
We use Google Chrome for converting documentation to PDF format, as Chrome’s PDF engine preserves hyperlinks used in webpages.
Here are the steps to convert the project documentation files to PDF format:
-
Follow the instructions in UsingGradle.adoc to convert the AsciiDoc files in the
docs/directory to HTML format. -
Go to your generated HTML files in the
build/docsfolder, right click on them and selectOpen with→Google Chrome. -
Within Chrome, click on the
Printoption in Chrome’s menu. -
Set the destination to
Save as PDF, then clickSaveto save a copy of the file in PDF format. For best results, use the settings indicated in Figure 5.3.1 below.
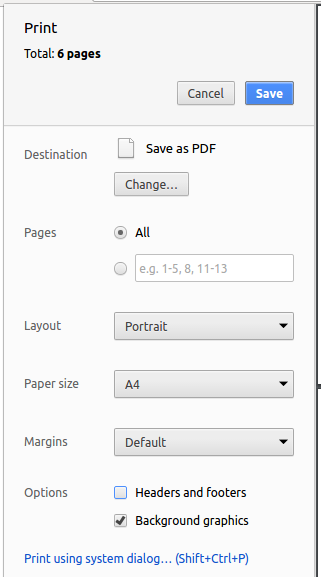
Figure 5.3.1: Saving documentation as PDF files in Chrome
6. Testing
6.1. Running Tests
There are three ways to run tests.
Note that due to the nature of the Date Borrow field in Person Class,
it is advisable that developers do not test at midnight where the date might change.
| The most reliable way to run tests is the 3rd one. The first two methods might fail some GUI tests due to platform/resolution-specific idiosyncrasies. |
Method 1: Using IntelliJ JUnit test runner:
-
To run all tests, right-click on the
src/test/javafolder and chooseRun 'All Tests' -
To run a subset of tests, you can right-click on a test package, test class, or a test and choose
Run 'ABC'
Method 2: Using Gradle:
-
Open a console and run the command
gradlew clean allTests(Mac/Linux:./gradlew clean allTests)
| See UsingGradle.adoc for more info on how to run tests using Gradle. |
Method 3: Using Gradle (headless):
Thanks to the TestFX library we use, our GUI tests can be run in the headless mode. In the headless mode, GUI tests do not show up on the screen. That means the developer can do other things on the Computer while the tests are running.
To run tests in headless mode, open a console and run the command gradlew clean headless allTests (Mac/Linux: ./gradlew clean headless allTests)
6.2. Types of tests
We have two types of tests:
-
GUI Tests - These are tests involving the GUI. They include,
-
System Tests that test the entire App by simulating user actions on the GUI. These are in the
systemtestspackage. -
Unit tests that test the individual components. These are in
seedu.address.uipackage.
-
-
Non-GUI Tests - These are tests not involving the GUI. They include,
-
Unit tests targeting the lowest level methods/classes.
e.g.seedu.address.commons.StringUtilTest -
Integration tests that are checking the integration of multiple code units (those code units are assumed to be working).
e.g.seedu.address.storage.StorageManagerTest -
Hybrids of unit and integration tests. These test are checking multiple code units as well as how the are connected together.
e.g.seedu.address.logic.LogicManagerTest
-
6.3. Troubleshooting Testing
Problem: HelpWindowTest fails with a NullPointerException:
-
Reason: One of its dependencies,
UserGuide.htmlinsrc/main/resources/docsis missing. -
Solution: Execute Gradle task
processResources.
7. Dev Ops
7.1. Build Automation
See UsingGradle.adoc to learn how to use Gradle for build automation.
7.2. Continuous Integration
We use Travis CI and AppVeyor to perform Continuous Integration on our projects. See UsingTravis.adoc and UsingAppVeyor.adoc for more details.
7.3. Making a Release
Here are the steps to create a new release:
-
Update the version number in
MainApp.java. -
Generate a JAR file using Gradle.
-
Tag the repo with the version number. e.g.
v0.1 -
Create a new release using GitHub and upload the JAR file you created.
7.4. Managing Dependencies
A project often depends on third-party libraries. For example, Address Book depends on the Jackson library for XML parsing. Managing these dependencies can be automated using Gradle. For example, Gradle can download the dependencies automatically, which is better than these alternatives:
a. Include those libraries in the repo (this bloats the repo size)
b. Require developers to download those libraries manually (this creates extra work for developers)
Appendix A: Suggested Programming Tasks to Get Started
Suggested path for new programmers:
-
First, add small local-impact (i.e. the impact of the change does not go beyond the component) enhancements to one component at a time. Some suggestions are given in this section Improving a Component.
-
Next, add a feature that touches multiple components to learn how to implement an end-to-end feature across all components. The section Creating a new command:
remarkexplains how to go about adding such a feature.
A.1. Improving each component
Each individual exercise in this section is component-based (i.e. you would not need to modify the other components to get it to work).
Logic component
Do take a look at the Design: Logic Component section before attempting to modify the Logic component.
|
-
Add a shorthand equivalent alias for each of the individual commands. For example, besides typing
clear, the user can also typecto remove all persons in the list.
Model component
Do take a look at the Design: Model Component section before attempting to modify the Model component.
|
-
Add a
removeTag(Tag)method. The specified tag will be removed from everyone in the address book.
Ui component
Do take a look at the Design: UI Component section before attempting to modify the UI component.
|
-
Use different colors for different tags inside person cards. For example,
friendstags can be all in grey, andcolleaguestags can be all in red.Before
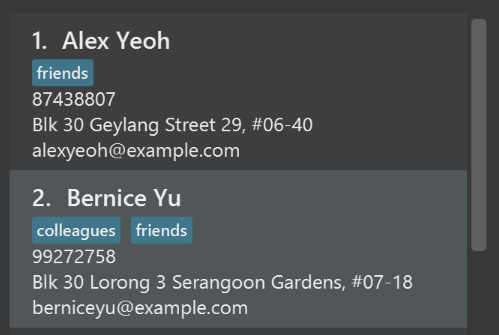
Figure A.1.1a: Before modification of tag colors
After
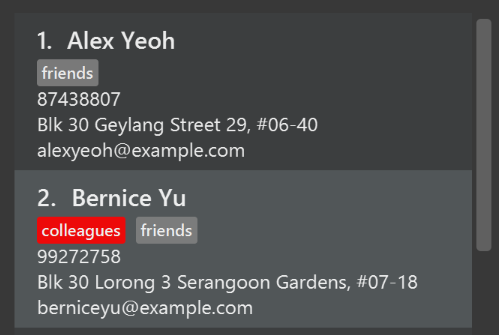
Figure A.1.1b: After modification of tag colors
-
Modify
NewResultAvailableEventsuch thatResultDisplaycan show a different style on error (currently it shows the same regardless of errors).Before
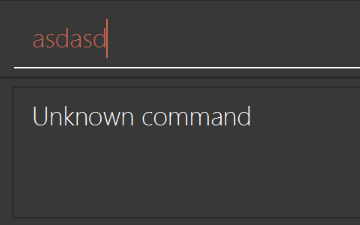
Figure A.1.2a: Before modification of `NewResultAvailableEvent`
After
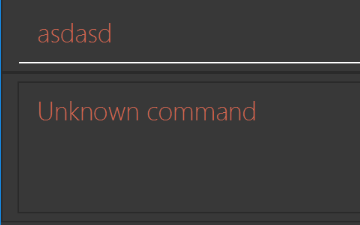
Figure A.1.2b: After modification of `NewResultAvailableEvent`
-
Modify the
StatusBarFooterto show the total number of people in the address book.Before

Figure A.1.3a: Before modification of `StatusBarFooter`
After

Figure A.1.4b: After modification of `StatusBarFooter`
Storage component
Do take a look at the Design: Storage Component section before attempting to modify the Storage component.
|
-
Add a new method
backupAddressBook(ReadOnlyAddressBook), so that the address book can be saved in a fixed temporary location.
A.2. Creating a new command: remark
By creating this command, you will get a chance to learn how to implement a feature end-to-end, touching all major components of the app.
A.2.1. Description
Edits the remark for a person specified in the INDEX.
Format: remark INDEX r/[REMARK]
Examples:
-
remark 1 r/Likes to drink coffee.
Edits the remark for the first person toLikes to drink coffee. -
remark 1 r/
Removes the remark for the first person.
A.2.2. Step-by-step Instructions
[Step 1] Logic: Teach the app to accept 'remark' which does nothing
Let’s start by teaching the application how to parse a remark command. We will add the logic of remark later.
Main:
-
Add a
RemarkCommandthat extendsUndoableCommand. Upon execution, it should just throw anException. -
Modify
AddressBookParserto accept aRemarkCommand.
Tests:
-
Add
RemarkCommandTestthat tests thatexecuteUndoableCommand()throws an Exception. -
Add new test method to
AddressBookParserTest, which tests that typing "remark" returns an instance ofRemarkCommand.
[Step 2] Logic: Teach the app to accept 'remark' arguments
Let’s teach the application to parse arguments that our remark command will accept. E.g. 1 r/Likes to drink coffee.
Main:
-
Modify
RemarkCommandto take in anIndexandStringand print those two parameters as the error message. -
Add
RemarkCommandParserthat knows how to parse two arguments, one index and one with prefix 'r/'. -
Modify
AddressBookParserto use the newly implementedRemarkCommandParser.
Tests:
-
Modify
RemarkCommandTestto test theRemarkCommand#equals()method. -
Add
RemarkCommandParserTestthat tests different boundary values forRemarkCommandParser. -
Modify
AddressBookParserTestto test that the correct command is generated according to the user input.
[Step 3] Ui: Add a placeholder for remark in PersonCard
Let’s add a placeholder on all our PersonCard s to display a remark for each person later.
Main:
-
Add a
Labelwith any random text insidePersonListCard.fxml. -
Add FXML annotation in
PersonCardto tie the variable to the actual label.
Tests:
-
Modify
PersonCardHandleso that future tests can read the contents of the remark label.
[Step 4] Model: Add Remark class
We have to properly encapsulate the remark in our ReadOnlyPerson class. Instead of just using a String, let’s follow the conventional class structure that the codebase already uses by adding a Remark class.
Main:
-
Add
Remarkto model component (you can copy fromAddress, remove the regex and change the names accordingly). -
Modify
RemarkCommandto now take in aRemarkinstead of aString.
Tests:
-
Add test for
Remark, to test theRemark#equals()method.
[Step 5] Model: Modify ReadOnlyPerson to support a Remark field
Now we have the Remark class, we need to actually use it inside ReadOnlyPerson.
Main:
-
Add three methods
setRemark(Remark),getRemark()andremarkProperty(). Be sure to implement these newly created methods inPerson, which implements theReadOnlyPersoninterface. -
You may assume that the user will not be able to use the
addandeditcommands to modify the remarks field (i.e. the person will be created without a remark). -
Modify
SampleDataUtilto add remarks for the sample data (delete youraddressBook.xmlso that the application will load the sample data when you launch it.)
[Step 6] Storage: Add Remark field to XmlAdaptedPerson class
We now have Remark s for Person s, but they will be gone when we exit the application. Let’s modify XmlAdaptedPerson to include a Remark field so that it will be saved.
Main:
-
Add a new Xml field for
Remark. -
Be sure to modify the logic of the constructor and
toModelType(), which handles the conversion to/fromReadOnlyPerson.
Tests:
-
Fix
validAddressBook.xmlsuch that the XML tests will not fail due to a missing<remark>element.
[Step 7] Ui: Connect Remark field to PersonCard
Our remark label in PersonCard is still a placeholder. Let’s bring it to life by binding it with the actual remark field.
Main:
-
Modify
PersonCard#bindListeners()to add the binding forremark.
Tests:
-
Modify
GuiTestAssert#assertCardDisplaysPerson(…)so that it will compare the remark label. -
In
PersonCardTest, callpersonWithTags.setRemark(ALICE.getRemark())to test that changes in thePerson's remark correctly updates the correspondingPersonCard.
[Step 8] Logic: Implement RemarkCommand#execute() logic
We now have everything set up… but we still can’t modify the remarks. Let’s finish it up by adding in actual logic for our remark command.
Main:
-
Replace the logic in
RemarkCommand#execute()(that currently just throws anException), with the actual logic to modify the remarks of a person.
Tests:
-
Update
RemarkCommandTestto test that theexecute()logic works.
A.2.3. Full Solution
See this PR for the step-by-step solution.
Appendix B: User Stories
Priorities: High (must have) - * * *, Medium (nice to have) - * *, Low (unlikely to have) - *
| Priority | As a … | I want to … | So that I can… |
|---|---|---|---|
|
new user |
see usage instructions |
refer to instructions when I forget my way around the App |
|
user |
add a new person |
|
|
user |
delete a person |
remove entries that I no longer need |
|
user |
find a person by name |
locate details of persons without having to go through the entire list |
|
user |
edit contacts |
|
|
user |
add tags to my contacts |
group them by other classifications as I prefer |
|
user |
filter my contacts by tags |
easily see only contacts that are tagged with the tag of interest |
|
user |
save multiple phone numbers to one contact |
have multiple ways of contacting a contact |
|
debt collector |
indicate and update amount owed by a debtor when the debtor borrows or returns money |
see how much a debtor owes |
|
debt collector |
sort my contacts by the amount owed |
|
|
debt collector |
have a whitelist |
use that list for record keeping |
|
debt collector |
have a blacklist |
know who not to lend money to |
|
debt collector |
have a list of debtors whose debts are overdue |
|
|
debt collector |
have an automated interest calculator |
have my debtors' debts updated automatically every month |
|
debt collector |
group my debtors by clusters |
plan my visit schedules easily |
|
debt collector |
have a debt field |
store the amount of debt each Person has |
|
debt collector |
have a deadline field |
keep track of the deadline of the Person’s debt |
|
debt collector |
have a date borrowed field |
|
|
security-concerned debt collector |
have password protection to my account |
have some security over confidential information |
|
efficient debt collector |
have an automated journey scheduler |
maximise my efficiency |
|
security-concerned debt collector |
receive an email notification when logging in from an unknown device |
know when there are unintended logins to my account |
|
versatile user |
have different appearance themes |
have a more unique user experience that suits my preferences |
|
new user |
have a guided installation/no installation |
easily start using it |
|
clumsy user |
have automatic backups |
not worry about accidentally deleting things |
|
debt collector |
have the ability to impose different periods of ban on my blacklisted clients |
have clients automatically transferred out of that list after their ban |
|
debt collector |
have the ability to perform validity checks on clients' personal information (HP,Email address) |
verify that their data is genuine |
|
meticulous debt collector |
see my client’s progress-bar which indicates their debt & the time remaining to pay it off |
have a better visual representation of data |
|
new user |
have a Help command that displays screenshots of positive examples |
understand the commands more visually |
|
meticulous debt collector |
have a feature that prevents duplicate contacts to be added |
ensure that the system is not unnecessarily complex |
|
debt collector |
have profile pictures for my clients |
easily identify them in a glance |
|
security-concerned debt collector |
view my last login time |
ensure that no one else is using my account |
|
security-concerned debt collector |
have 2FA authentication for login and every other important action(exporting contacts) |
ensure that no one else is capable of accessing sensitive information |
|
multi-device user |
be able to export my contacts in another format (e.g xml, vcf) |
store my contacts in another device |
|
debt collector |
create custom fields |
store additional information for some contacts |
|
debt collector |
randomly generate a contact from the whitelist |
choose to chat up a random contact to talk them into getting a loan |
|
debt collector |
use a file upload feature |
upload signed documents to a specific client record in the database |
|
debt collector |
have a 'add-log' button that generates specific date and time(at the instance of clicking the button) |
fill up the call log sheet of a contact without manually typing the exact instance of time |
Appendix C: Use Cases
(For all use cases below, the System is Codii and the Actor is the user, unless specified otherwise)
Use case: Delete person
MSS
-
User requests to list persons
-
Codii shows a list of persons
-
User requests to delete a specific person in the list
-
Codii deletes the person
Use case ends.
Extensions
-
2a. The list is empty.
Use case ends.
-
3a. The given index is invalid.
-
3a1. Codii shows an error message.
Use case resumes at step 2.
-
Use case: Add tag to person
MSS
-
User requests to add a new tag to a person
-
Codii adds the tag to the person
Use case ends.
Use case: Sort by name
MSS
-
User requests to sort person list by name of persons
-
Codii shows a sorted list of persons
Use case ends.
Extensions
-
2a. Codii is empty i.e. there are no contacts stored in Codii.
Use case ends.
Use case: Add a person to blacklist
MSS
-
User requests to list all persons i.e. to show the masterlist
-
Codii shows the masterlist
-
User requests to ban a specific person in the list
-
Codii adds the person into the blacklist
-
User requests to list blacklisted contacts
-
Codii shows the blacklist
Extensions
-
2a. The masterlist is empty.
Use case ends.
-
3a. The given index is invalid.
-
3a1. Codii shows an error message.
Use case resumes at step 2.
-
Use case: Edit person
MSS
-
User requests to edit a person
-
Codii displays the current information of the person
-
User edits the information in person
-
Codii updates the information in person
Use case ends.
Extensions
-
2a. User keys in invalid information into fields.
-
2a1. Codii shows an error message.
Use case resumes at step 2.
-
Use case: Add person
MSS
-
User requests to add a person in the list
-
Codii adds the person
Use case ends.
Extensions
-
1a. The person already exists in the address book.
-
1a1. Codii shows an error message.
Use case resumes at step 1.
-
-
1b. The user enters the command in a wrong format into the command box.
-
1b1. Codii shows an error message.
Use case resumes at step 1.
-
Use case: Find person by name
MSS
-
User requests to find person by name
-
Codii shows a list of corresponding persons with any of the given keywords
Use case ends.
Extensions
-
1a. No matches found.
-
1a1. Codii shows 0 persons found.
Use case ends.
-
Appendix D: Non Functional Requirements
-
Should work on any mainstream OS as long as it has Java
1.8.0_60or higher installed. -
Should be able to hold up to 1000 persons without a noticeable sluggishness in performance for typical usage.
-
A user with above average typing speed for regular English text (i.e. not code, not system admin commands) should be able to accomplish most of the tasks faster using commands than using the mouse.
-
Should not take more than two seconds to complete a command.
-
The system should be maintainable with proper documentation.
-
The system should be usable by a novice who has never used an address book application before.
Appendix E: Glossary
| Term |
|---|
Definition |
An extra layer of security that is known as "multi factor authentication" that requires not only a password and username but also a token |
A period of prohibition in which the person is not allowed to loan money |
A list of people who are banned from borrowing |
General location based on postal districts |
An official record of events |
Windows, Linux, Unix, OS-X |
A contact detail that is not meant to be shared with others |
A visual representation that shows a user how far along he/she is in a process |
A list of people who have cleared their debts |
Appendix F: Product Survey
| Pros | Cons |
|---|---|
Easy to use |
Can only enter one phone number |
Has all contact information fields |
| Pros | Cons |
|---|---|
Simple to use |
Cannot import from Google contacts |
Search address function is brilliant - fast and intuitive |
|
GPS location |
|
Nice clean interface |
|
No ads |
| Pros | Cons |
|---|---|
Simple to use |
Can’t edit groups once formed |
It categorizes contacts into groups |
Does not have enough fields |
| Pros | Cons |
|---|---|
Shows map of user location |
Doesn’t open all the time |
Easy to use |
Very slow |